The first step is to download and install the preferred
Eclipse distribution. As user there are two main choices,
which to make is dependent on which language your development
will be based on. Here we will show how to install an Eclipse
environment for SAVE-IDE based on C/C++ and JAVA. In the
places where the installition differs between C/C++ and JAVA
each choice is marked with  and
and
 . You have to chose one of the two
approaches and consequently follow either the C/C++ or the
JAVA aaproach throughout the whole installation guide.
. You have to chose one of the two
approaches and consequently follow either the C/C++ or the
JAVA aaproach throughout the whole installation guide.
Eclipse can be downloaded from Eclipse home page. The
official distributions can be found at the download
page. Eclipse distribution for C/C++ is named
Eclipse IDE for
C/C++ Developers. Eclipse distribution for JAVA
is named Eclipse IDE for Java
Developers.
Create a temporary directory. For example, in Windows create C:\tmp if it not already exists. The temporary directory may be omitted and the packages can be unpacked in their final destination directly. But using a temporary directory will save you time if something goes wrong later on in the installation. If you have unpacked the packages into a temporary directory you do not have to start all over from scratch but rather copy the unpacked packages.
- Unpack the Eclipse
IDE for C/C++ Developers distribution into the
temporary directory
(C:\tmp). If you are
using WinZip or
WinRar right-click the
packed file and chose 'extract to' and type
c:\tmp as destination.
- Unpack the Eclipse
IDE for JAVA Developers distribution into the
temporary directory.
The Acceleo Distribution can be downloaded from Acceleo's home page. Follow the link to the Download page. Chose the latest stable release for the Eclipse distribution downloaded earlier. Download the Acceleo run-time plug-in.
Unpack the Acceleo run-time distribution in the same temporary directory as the Eclipse distribution (C:\tmp). The Acceleo is now installed into the Eclipse directory.
Before installing the modeling and graphical frameworks we must copy the temporary Eclipse directory into its final destination. For our example, copy and rename the C:\tmp\eclipse to C:\eclipse_user. Take the time to also create a directory for the workspace to use, C:\ws_user.
The modeling and graphical frameworks are installed from within the Eclipse environment, therefore Eclips must be started first.
Start Eclipse by double click eclipse.exe in C:\eclipse_user. For easy start when using Eclipse later on, create a shortcut and place it on the desktop or in the start menu.
If this is the first time you run the installed Eclipse you must open up the workbench by clicking the Workbench icon in the Welcome screen. If you have run Eclipse before you will automatically be taken to the Workbench.
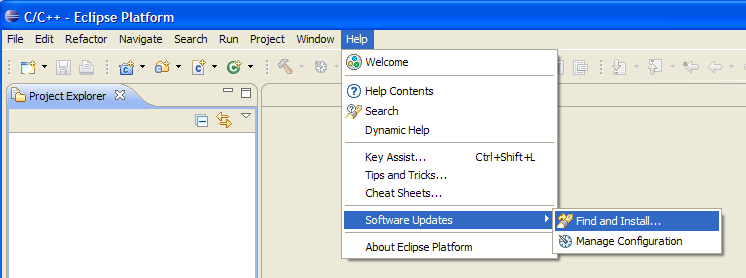
Now it is time to install the modeling and graphical frameworks. This is done by using the Eclipse install and update service. Begin to install by via the Help menu select Software Updates and Find and Install.
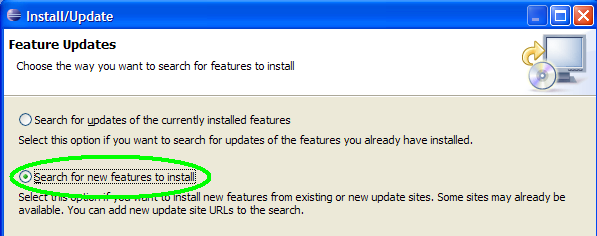
When taken to the Install/Update dialog then chose Search for new features to install. This choice must be done since we do not have the modeling and graphical frameworks installed already.
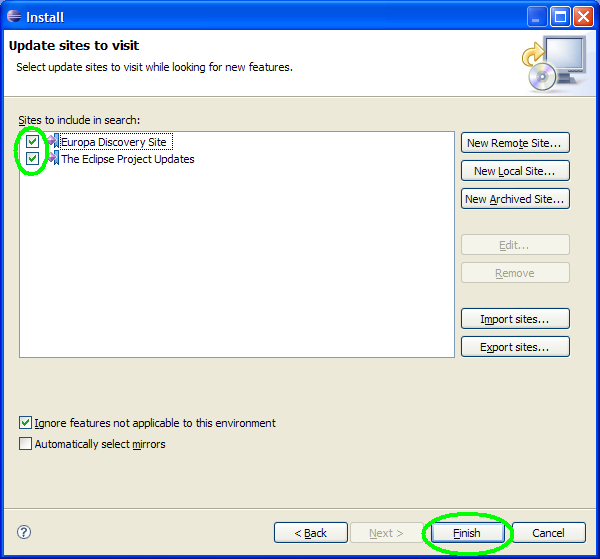
Next you must tell the update tool which update sites you want to use. Check the Europa Discovery Site and The Eclipse Project Updates site. When you have marked both sites click the Finish button to continue. You will be promted to chose a mirror form which to download the new features. Either chose one that you prefer or let the update tool automatically find a mirror.
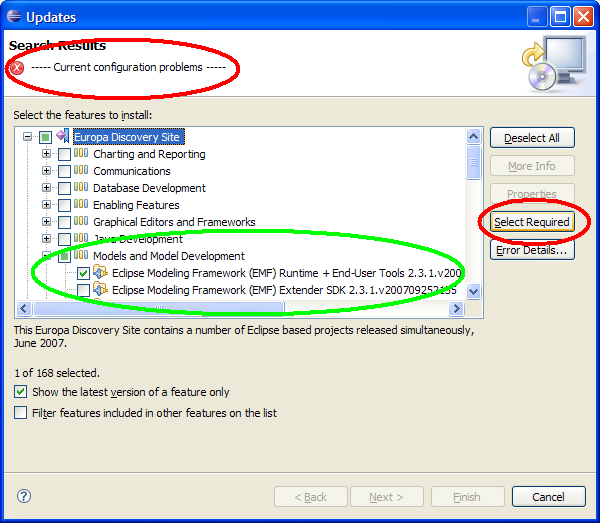
Begin with installing Eclipse Modeling Framework (EMF) Runtime + End-User Tools. You find EMF in Europa Discovery Site under Models and Model Development. When you mark this selection you will get an error ----- Current configuration problems -----, this is solved by click the Select Required button.
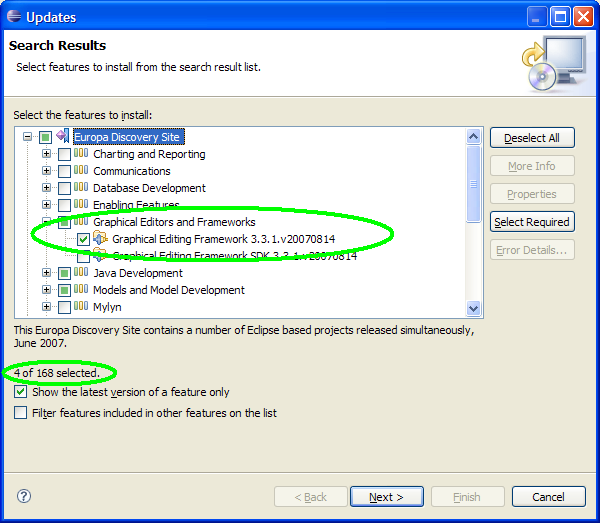
Continue by mark Graphical Editing Framework. You shoukd now have four new features marked for installation.
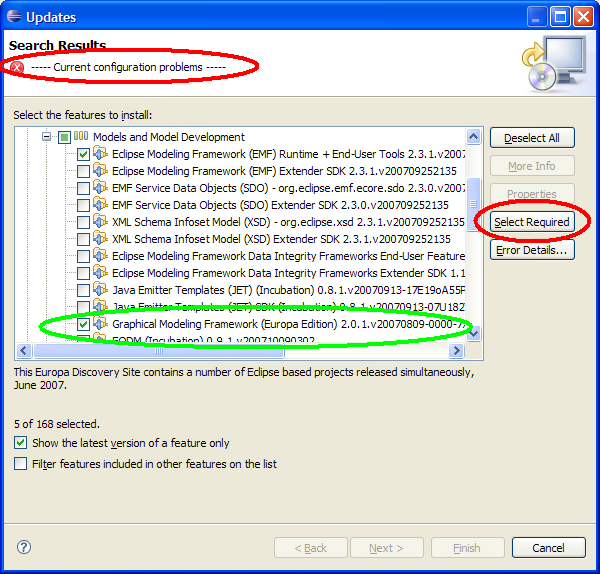
It is now time to install Graphical Modeling Framework (Europa Edition). By marking GMF for installation an error will occur, ----- Current configuration problems -----, which is solved by clicking the Select Required button.
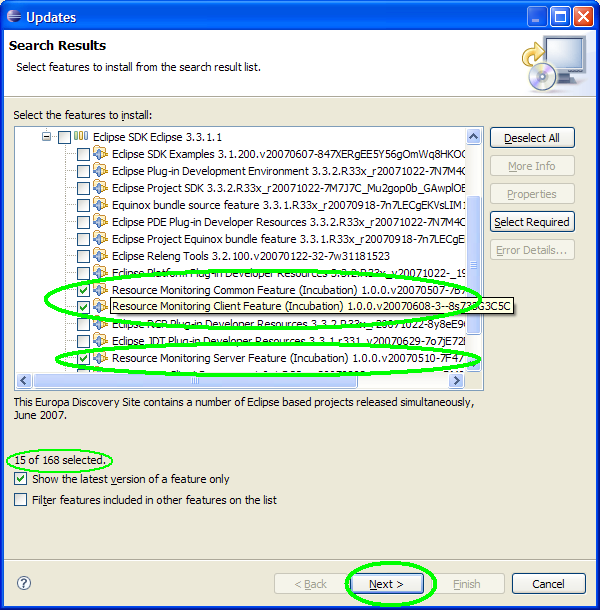
You have now installed all necessary modeling and graphical frameworks, however for the SAVE-IDE to work with the frameworks additional resources must be installed. Expand The Eclipse Project Updates site. Mark the following three features Resource Monitoring Common Feature, Resource Monitoring Client Feature and Resource Monitoring Server Feature. You should now have fifteen features marked for installation. To continue click the Next button.
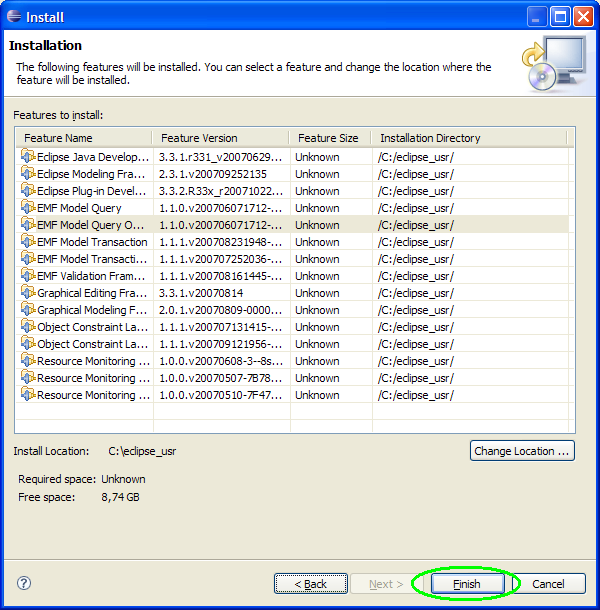
In the Install dialog verify that the needed features is marked and click Next button.
After the features is downloaded the actual installation begins. Here you may have to accept that the features should be installed and may have to accept unsigned features. When prompted for restart, follow the instructions in the dialog and chose to restart Eclipse. Installation done you are now ready to install the SAVE-IDE plugins.